Here's what I recommend:
If you cannot afford a paint gun assembly, then you are almost forced to paint using a spray can. No worries though...
What Works:
Dupli-Color makes a vinyl paint that works very well. It is called "Dupli-Color vinyl and fabric coating."
If you want to match the color of your Mustang I recommend buying from Dupli-Color.
How to do the painting (in case you are wondering)
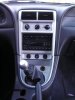
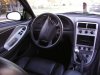
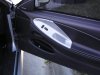
It is not hard at all to paint the interior of your car. You simply need to remove the trim that you wish to paint.
Prep
The best way to promote adhesion is to sand the surface down a bit. Use some fine sandpaper (400-600 works well) to etch the surface of the trim.
Wash the trim in water to remove any dust or other particular matter.
Prime the trim with 70-90% IPA. I don't recommend 99% because it can lead to degradation in some polymers. Alcohol helps remove oils from your hands or other silica contaminants that can affect adhesion. I never really have a problem with adhesion, but it greatly depends based on the material.
Use a gray primer on the trim. Use two or three light coats. You don't need to drench the part in primer. What I found works well is to pepper the part lightly. Even if you don't cover every spot, that's ok. After 3 very light coats, the part will be covered evenly. Also, hold the can about 12-18" away. You do not want the pressure to splatter the primer everywhere.
If the texture of the primer is not to your satisfaction, use some very fine sandpaper to even the surface a bit. Again, make sure no dust remains on the part when done sanding.
Paint
Now that you are ready to paint the part, apply the same technique described above. Hold the can 12-18" away from the part to be painted. Remember that multiple thin coats yields a better quality than one thick coat.
If the paint runs, do not wipe it. Allow it to dry, and then sand down until the surface is even.
You can re-coat when the paint feels tacky to the touch- usually 2-4 hours after the initial coat.
Finish
If you do not like a satin finish, you can coat the part in a clear coating. Use the same technique described above. For this one, you really have to be patient.
Finally, never try to install a part that is not fully cured. You will peel paint. Believe it or not, but most paints take days to weeks to fully cure. Depending on the ambient temps/humidity, the reducers evaporate differently. If you clear-coat a part that was recently painted, you might find that the part "fogs" up. This is because the reducers surfaced beneath the clear-coat.
I recommend waiting 2 days before clear-coating, and then another 2 days before installing the part.
I once got greedy and tried installing parts I had painted three hours earlier. The paint peeled right up when I applied light pressure.
If you take your time, this turns out very nice and looks professionally done (even with spray-cans). 12$ isn't much for the stuff you need, but the time and patience are really what pulls it off.
If you cannot afford a paint gun assembly, then you are almost forced to paint using a spray can. No worries though...
What Works:
Dupli-Color makes a vinyl paint that works very well. It is called "Dupli-Color vinyl and fabric coating."
If you want to match the color of your Mustang I recommend buying from Dupli-Color.
How to do the painting (in case you are wondering)
It is not hard at all to paint the interior of your car. You simply need to remove the trim that you wish to paint.
Prep
The best way to promote adhesion is to sand the surface down a bit. Use some fine sandpaper (400-600 works well) to etch the surface of the trim.
Wash the trim in water to remove any dust or other particular matter.
Prime the trim with 70-90% IPA. I don't recommend 99% because it can lead to degradation in some polymers. Alcohol helps remove oils from your hands or other silica contaminants that can affect adhesion. I never really have a problem with adhesion, but it greatly depends based on the material.
Use a gray primer on the trim. Use two or three light coats. You don't need to drench the part in primer. What I found works well is to pepper the part lightly. Even if you don't cover every spot, that's ok. After 3 very light coats, the part will be covered evenly. Also, hold the can about 12-18" away. You do not want the pressure to splatter the primer everywhere.
If the texture of the primer is not to your satisfaction, use some very fine sandpaper to even the surface a bit. Again, make sure no dust remains on the part when done sanding.
Paint
Now that you are ready to paint the part, apply the same technique described above. Hold the can 12-18" away from the part to be painted. Remember that multiple thin coats yields a better quality than one thick coat.
If the paint runs, do not wipe it. Allow it to dry, and then sand down until the surface is even.
You can re-coat when the paint feels tacky to the touch- usually 2-4 hours after the initial coat.
Finish
If you do not like a satin finish, you can coat the part in a clear coating. Use the same technique described above. For this one, you really have to be patient.
Finally, never try to install a part that is not fully cured. You will peel paint. Believe it or not, but most paints take days to weeks to fully cure. Depending on the ambient temps/humidity, the reducers evaporate differently. If you clear-coat a part that was recently painted, you might find that the part "fogs" up. This is because the reducers surfaced beneath the clear-coat.
I recommend waiting 2 days before clear-coating, and then another 2 days before installing the part.
I once got greedy and tried installing parts I had painted three hours earlier. The paint peeled right up when I applied light pressure.
If you take your time, this turns out very nice and looks professionally done (even with spray-cans). 12$ isn't much for the stuff you need, but the time and patience are really what pulls it off.
Attachments
-
 56.4 KB Views: 477
 -
 49.5 KB Views: 412
 -
 60 KB Views: 1,709
")